 Skip to main contentSkip to footer
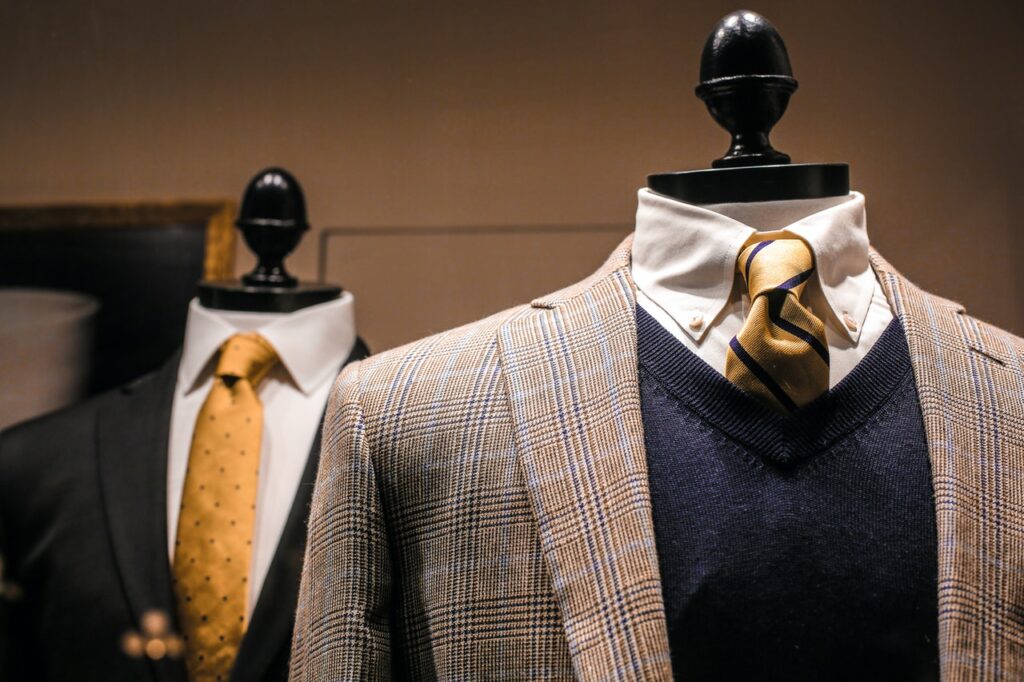
If you’re interested in attracting more fashion product photography clients to your business, then investing in a ghost mannequin (Amazon) is one of the best tools of the trade for your studio.
Not only is proper use of a ghost mannequin imperative to ensuring the job is done right, they are used to create the illusion a piece of apparel is being worn without any signs of an entity filling it. This allows customers to better imagine themselves wearing the product without comparing themselves to a model or mannequin.
Using a ghost mannequin in your product photography will immediately set your portfolio apart and boost the perceived value of your service. The key features of the mannequin are the removable parts, as well as using photo editing skills to your advantage. Make sure the unique aspects of the product are being showcased while making the mannequin as “invisible” as possible.

Once you’ve got the hang of how to flatter and accentuate the product with your mannequin, enhance its visual impact with some simple Photoshop techniques. Keep reading for exactly what you need to know to properly use a ghost mannequin for product photography.
Table of Contents
How to Use a Ghost Mannequin
It can be a challenge to show customers the unique fit and features of a product without blowing funds on hiring a model. So, as a product photographer with a ghost mannequin hiding in your closet, that’s where you come in.
As always, your objective is to show the apparel in its best light without drawing any attention away from form or figure. You will want to remove pieces of the mannequin that are visible, while creating the illusion that the piece is being worn.
Your goal is to bring the apparel to life.
Some high-end product photographers will use ghost mannequins with multiple removable parts that allow them to adapt to whatever piece of clothing they are photographing.
How do I Choose the Proper Ghost Mannequin?
Mannequins with removable parts are clearly the most efficient choice for this line of work. Time is money, and it will be easier to accentuate a piece without spending hours editing in Photoshop.
However, ghost mannequins can be quite expensive! If you aren’t intending on specializing in fashion photography, or you photograph fewer than 1 apparel item per week, then it may not make sense for you to get one.
With that said, if you are looking to get into this line of work and you cannot afford or prefer not to use one of these mannequins, the alternative technique would require at least one picture of the product on a regular mannequin (possible front and back) and one or more pictures of the product laying flat.
You would then use elements of each picture and edit them together to create one cohesive image. Also known as a composite (thought you could get away from doing those, eh?)!
When purchasing a mannequin, it is important to note that they come in various sizes and shapes, from lean figures to overweight/plus size, so you can appeal to potential buyers across the spectrum.
The more inclusive you are, the better, so try to acquire as many as you can over the course of your career.
What Else do I Need?
Of course, to be a serious ghost mannequin photographer, you’re going to need a few essential tools to create effective and competitive photos that will appeal to larger brands with bigger budgets. Here’s what we suggest:
- At least one mannequin (though it benefits you to have options)
- Photography camera of your choice
- A green screen or white backdrop
- A romperstomper editing computer with Photoshop
- Studio lighting
- Tissue paper
Once you have all the proper tools, you can get started. Be sure not to break down your set so you can take photos in the same lighting and with the same background to help with future editing and touch-ups.
How Do You Photograph Clothes with a Ghost Mannequin?
Now that you know what the goal is and the basic tools you will need. Let’s talk about taking the best photographs with ghost mannequins.
You’ll want to start by closely analyzing the product you are photographing. What length are the sleeves? Is it revealing or conservative? What unique features do you need to accent? This will allow you to choose the most appropriate mannequin or determine what parts should be removed for the best picture of the product.
Let’s say the product you are trying to photograph is a navy-blue men’s blazer with a pale blue satin lining.
Sounds pretty nice, right?
Believe it or not, how you photograph this piece will either persuade customers to buy it or leave them questioning if it suits them in style and form. Leave no doubt. Convince them that they must have it.
What is the Process?
So, back to the blazer. As this is a men’s blazer, choose a mannequin that best reflects the male form. For the sake of this example, we will assume you have a ghost mannequin with removable parts.
Blazers are built with long sleeves, so you will want to keep the mannequin’s arms attached. This ensures the sleeves with be filled rather than looking flat and limp in the photo. Next, button the blazer. This will guarantee a better silhouette and that the product exudes a look of sophistication.
Now you can start removing pieces. By design, the blazer will be low-cut once it’s buttoned, so remove any neckpiece the mannequin might have.
Some rookies might stop here, but wait, what about that beautiful satin lining?
We want to make sure the customer sees that, so remove any chest pieces required to reveal the lining while showing as little of the mannequin as possible. Take care to smooth any creases, and you’re set to start taking pictures.
What if I Don’t Have This Type of Mannequin?
If you are limited to a standard mannequin, don’t worry, you can still take excellent pictures with a bit of help. Suppose your mannequin is a gender-neutral torso. You will still take all the necessary steps described earlier to determine what elements of the product really need to shine in your photo.
Apart from the necessity of taking multiple pictures, both of the products on and off the mannequin, the most influential tool in this situation is tissue paper.
No, it’s not for your tears, it’s for the mannequin.
Tissue paper is perfect for filling out your mannequin and making certain “unique” features noticeable. For instance, if the product is a hoodie, tissue paper in the hood and front pocket will add life to the product and make its feature boldly visible.
You can also use it to enhance a general mannequin by creating broader shoulders or a chestier front to reflect gender and ensure the product falls naturally where it should.
How do You Make a Ghost Mannequin Effect in Photoshop?
Although using an alterable ghost mannequin is definitely the easiest way to take these photos, you can achieve the same look with a regular mannequin and some Photoshop magic. Here is a simple guide for this process.
Guide to creating the ghost mannequin effect:
- You will need at least two different pictures to achieve this illusion in Photoshop. One of the product on the mannequin and one of it on a flat surface.
- Once you have the two photos, go into Photoshop and pull up the photo using the mannequin.
- Open your “Layers” panel, if it isn’t already, and unlock the background layer that is your photo.
- Unlocking the layer will automatically create a new layer. It is best to name your layers, so it is easier to organize them. Double-click the layer name and label it “front.”
- It is highly recommended you right-click and select ‘Duplicate layer’ so you have two copies of the original in case of mistakes.
- Create a new layer and label it “background.” Then, using the paint bucket tool, paint it white.
- On the “front” layer, select your pen tool and follow the product’s path (not including the mannequin) to cut it out and remove the background.
- Under ‘Selection’ in your Photoshop palette, click ‘Select’> ‘Inverse’ then click delete. This should leave you with just the product and no signs of the mannequin.
- Now, pull up your flat photo and repeat steps 3-5.
- The piece you most likely need for this type of technique is the interior or collar of the product. Crop the element of the product you need and position it onto the “front” layer.
- With an eraser tool, smooth this area out once it is properly positioned. Then, add another layer and create a shadow with the brush tool if necessary (use about 35% opacity).
- Save the file when you have finished.
Final Thoughts
Ghost mannequin photography allows the everyday person to overcome the obstacle of themselves. If the photographer is skilled enough, they can bring any product to life that would otherwise be flat or displayed on a potentially intimidating form.
This technique also ensures that the buyer is entirely focused on the product and its unique qualities, rather than what might be wearing it.
Not only is it an exceptional skill, especially with the help of Photoshop, it also helps businesses that strive to sell spectacular products but can’t afford professional models. These images could easily boost company sales and expand its brand name as well as your own.

