 Skip to main contentSkip to footer
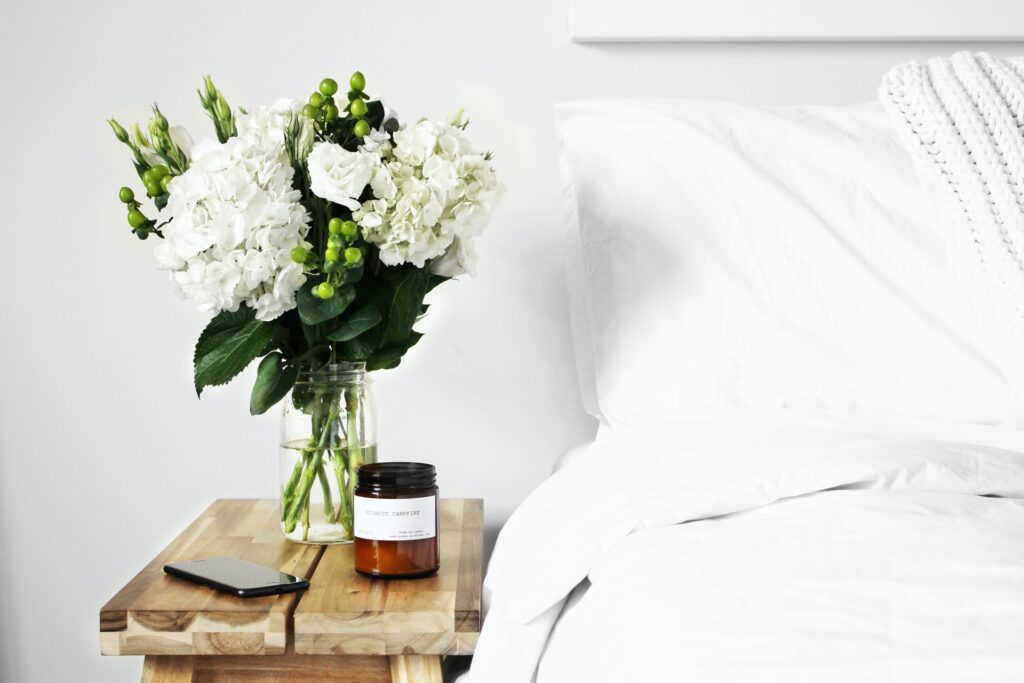
Lifestyle product photography is what it sounds like–it’s what you do to sell your products and services, typically by capturing them in everyday use.
What does that mean? It means the goal of lifestyle product photography is to show the use of a product or service in an everyday setting so that when customers see it they might think “that’s something I could do!”
As a photographer, it is your responsibility to ensure that you transmit the message that a product is an excellent addition to the customer’s life.
Lifestyle product photography is the process of photographing things using props that present them in realistic settings. Its objective is to attract purchasers to imagine themselves owning the product. To create lifestyle photographs, visualize the item’s purpose and include these elements into your scene.
In this post we’ll cover: what is lifestyle product photography all about; what are some best practices for getting started; what are some more advanced techniques for seasoned professionals; and how can you apply what you’ve learned.
Table of Contents
What Is Lifestyle Product Photography?
Lifestyle product photography is a photography subgenre that captures products and services in real-world situations where your ideal customer is using the product. Many manufacturers use lifestyle advertising to attract customers, establish rapport with clientele, and to provoke inquiries concerning functionality of products.
While lifestyle photography is all about delivering a genuine tale, lighting and location are still critical. While these are natural photographs, natural sunlight alone may not be sufficient to produce an acceptable picture.
How To Take Lifestyle Product Pictures

The secret to a good lifestyle product picture is preparation. These photos are meant to turn an inanimate object into a visual experience that is to be remembered by the viewer.
The first stage is to generate some ideas for the kind of settings in which your product will be employed.
When brainstorming, consider the following questions:
- Who will make use of the item?
- What is it best suited for?
- What else can you do with it?
- Where will the product be put to use?
- What is the customer’s need for the product?
During your planning, keep in mind that the optimal place for your product is the area in which customers will actually use it. If you don’t have access to the correct location, you can construct a setting in a studio that looks like it using props and models.
Also, think about combining your product with other items from its surroundings. For example, trees and flowers can be excellent accents for organic products and skincare. Check out our article on product photography props for a complete guide.
Following the completion of the planning phase, there are technical steps to creating great lifestyle photos for a product advertisement.
Get a Camera With High Resolution
You’ll need a camera that captures images at a high enough quality so they don’t seem fuzzy on more extensive displays. Additionally, you’ll want your camera to have exposure control so that you may modify the lighting.
The following are some suggested camera settings for product photography:
- Focus: Manual (Tripod), Auto (Hand held)
- ISO: 100
- Aperture: f/2.8-f/8
- Shutter: 80-200
As an artist, you should choose the settings that best achieve your brand style. However, these settings might be a starting point for photographers unsure how to configure their cameras appropriately.
You may even use a smartphone in place of a camera. These customizations are accessible in the native camera app.
Put Your Camera on a Tripod
To get professional lifestyle images, your product photographs should be free of blurring. To capture the most pleasing shots possible, you’ll need stabilizing tools such as a tripod that keeps your camera perfectly still. A phone mount will be beneficial if you’re using a smartphone.
The most practical reason to use a tripod is to ensure the camera’s steadiness. Additionally, it eliminates operator camera shaking, which is particularly important when longer exposure durations are required to capture an image. Usually this last point isn’t an issue if you’re using powerful strobe lighting instead of continuous light.
A tripod is especially beneficial if you are photographing a moving item in harsh weather. You can create a more steady shot by mounting your camera on a tripod and turning on the built-in shutter timer so it doesn’t shake when you push the button.
Pick Natural or Artificial Light, but Not Both
When you choose what type of lighting to employ, there are a few rules to take into account. Do you want natural light or artificial light? Natural light is best when the interior of your scene contains windows that let in sufficient sunlight. Artificial light works better when you need to control every detail of the scene and consistency between shots is important.
The appropriate lighting setup enables you to highlight the product’s important features with a context essential in helping customers in making decisions. You may pick between two forms of light: natural or artificial.
Natural light is ideal for e-commerce product pictures if the following conditions are met:
- The product is used outside.
- A person is using the item.
- You’re attempting to draw attention to the product’s surroundings rather than to its unique qualities.
Light bulbs are examples of artificial light. It results in a more focused, yet smaller, light surface. You should note that artificial light is mainly used for e-commerce.
As a general guideline, each lifestyle image should include just one sort of light to make it easy on yourself both during the shoot as well as post production.
Using two types of light sources makes it difficult to get accurate, consistent colors; therefore, what’s more common in product photography is using one type of light source (typically artificial).
By incorporating natural light into an artificially lit photograph, you may soften a product that is intended to seem crisp. And by including artificial light into a naturally lit shot, you get the opposite effect.
Lifestyle Product Photography Tips for Beginners

Contrary to common assumptions, most photographers consider lifestyle photography very simple since it involves reproducing scenes that we might already be familiar with in life. This method is ideal for beginners since it needs less equipment and specialized expertise.
The most critical aspect of product photography is matching the photographs’ appearance and feel to the product and brand.
Here are some lifestyle product photography tips for beginners to try:
- Try shooting from multiple angles.
- Group product lines for photos.
- Clean products without leaving streaks or debris.
- Optimize graphics with photo compression.
Try Shooting From Multiple Angles
While eye-level photography is useful, you may differentiate yourself from the competition by pursuing new viewpoints that the human eye does not typically notice.
For instance, you may attempt photographing from under the goods. This is particularly true if the object is handcrafted. Getting up close demonstrates the artisan’s care and regard for their work.
Generally, details are what set things apart from their competitors, so make sure to highlight them.
Shooting from numerous perspectives is also a simple technique to develop additional material for social media accounts. Many company owners struggle to generate enough material to share on social media consistently, so the extra pictures may be a huge help.
Group Product Lines for Photos
Grouping similar items together exposes them to targeted buyers and allows for comparison. Customers can see things side by side, which helps them grasp the variations in size and form and how they are intended to operate together.
Additionally, it may even encourage people to purchase the whole package as this tip is an excellent marketing tool. And if you understand how to market via photography, you will stand out to clients as a professional.
Clean Products Without Leaving Streaks or Debris
High-quality cameras capture all details on the object, which includes every spec of lint, dust, dirt, and fingerprints.
As much as possible, use natural and gentle cleaners. Additionally, it would be best if you used lint-free cloths, such as polyester lint-free towels.
Vinegar is an all-purpose organic cleanser that is safe to use on any product. As a mild acid, it can dissolve layers of dirt, filth, and fingerprint oils. In a jar, combine a small quantity of vinegar, ½ tsp. (2.9 mL) of mild liquid detergent, and some warm water to create a natural cleaning solution.
This is a mild concoction that will not harm the product’s finish. You should be aware that vinegar has a mild odor that dissipates after a few hours.
Finally, use gloves to prevent fingerprints from being left on the merchandise. We like to use cotton or microfiber gloves because they are easy to take on/off, are breathable, reusable, and make us look professional when handling products.
Optimize Graphics With Photo Compression
Search engine optimization is critical for all online merchants.
One crucial factor is the load speed of an e-commerce website, and huge lifestyle images may significantly slow this down.
The first step in optimizing your picture is to reduce its height and width.
When you see an image on a website, you are viewing an HTML container holding an image that has been resized to fit inside it.
If the container on a website is 648 pixels wide, the picture should be reduced to nearly perfectly fit the container. This speeds up the loading process, particularly if you’re utilizing a large number of photographs.
Final Thoughts
Lifestyle product photography is one of the most effective ways to sell goods online, but a few tips go a long way toward achieving your goals. Always ensure that your product shots are correctly exposed and focused. As long as these two points are accurate, your photos will look great.
All that remains is to practice until you feel comfortable shooting items like a pro. And if lifestyle product photography isn’t your cup of tea, explore still life photography that integrates lifestyle concepts.
Hannah Quintana offers a video that can assist you in getting started in lifestyle photography:

